
Connect an AI app with MCP
MCP (Model Context Protocol) is how an AI app talks to BeanHub. Hosted BeanHub MCP lives at https://api.beanhub.io/mcp. The app signs in with OAuth. It does not use a CLI access token.
This page is the hosted server. A local bh mcp server that reads files on your laptop is a different tool.
What an app can do
Section titled “What an app can do”With read access the app can list books, accounts, entries, files, forms, and commits, and it can search transactions and balances. With updates it can add or change entries, rename accounts, submit a custom form, or rewrite ledger files. Every update is the same path as the website: a Git commit after Beancount validation.
The app cannot mint access tokens, change billing, connect a bank, dump Connect or Inbox data, make a book public, or delete a book.
Enable MCP
Section titled “Enable MCP”MCP is off until you turn it on.
- Sign in at https://app.beanhub.io.
- Open Account Settings, then Manage MCP, or go to https://app.beanhub.io/mcp/.
- Turn on Enable Model Context Protocol (MCP).
- Click Save MCP settings.
Copy the server URL from that page: https://api.beanhub.io/mcp. That is what you paste into the AI app. Do not paste https://app.beanhub.io/mcp/. That is this settings page, not the MCP server.
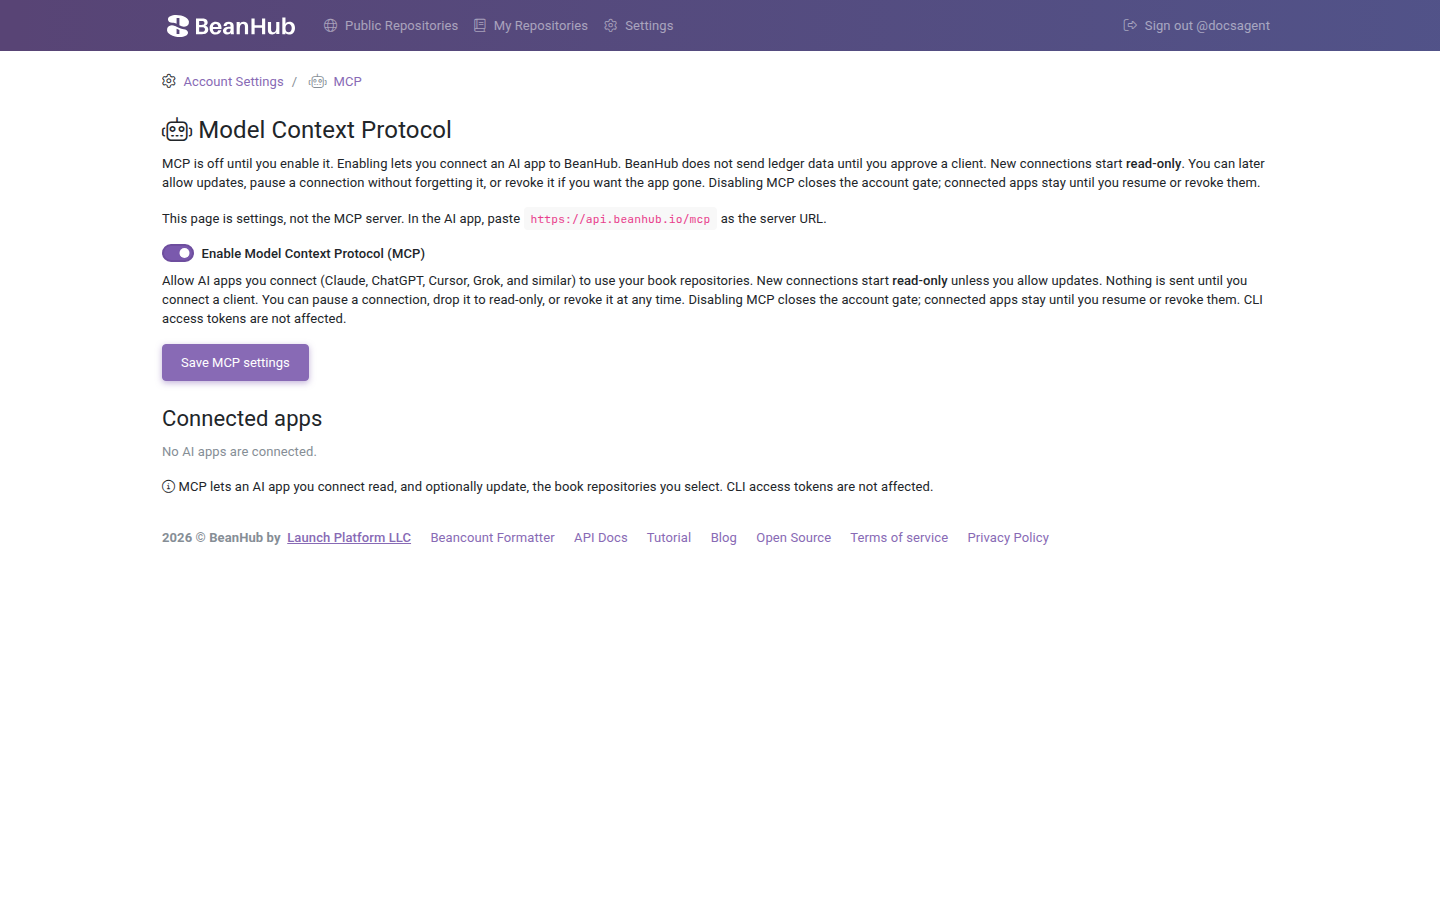
New connections start read-only and unpaused. You choose books on the connect screen. You can allow updates later without reconnecting.
Connect an app
Section titled “Connect an app”Enable MCP first. In the AI app, add a custom MCP server and paste https://api.beanhub.io/mcp. The app opens BeanHub’s connect page. Sign in if asked, pick books, leave Allow this app to update books off unless you want writes, then click Allow access.
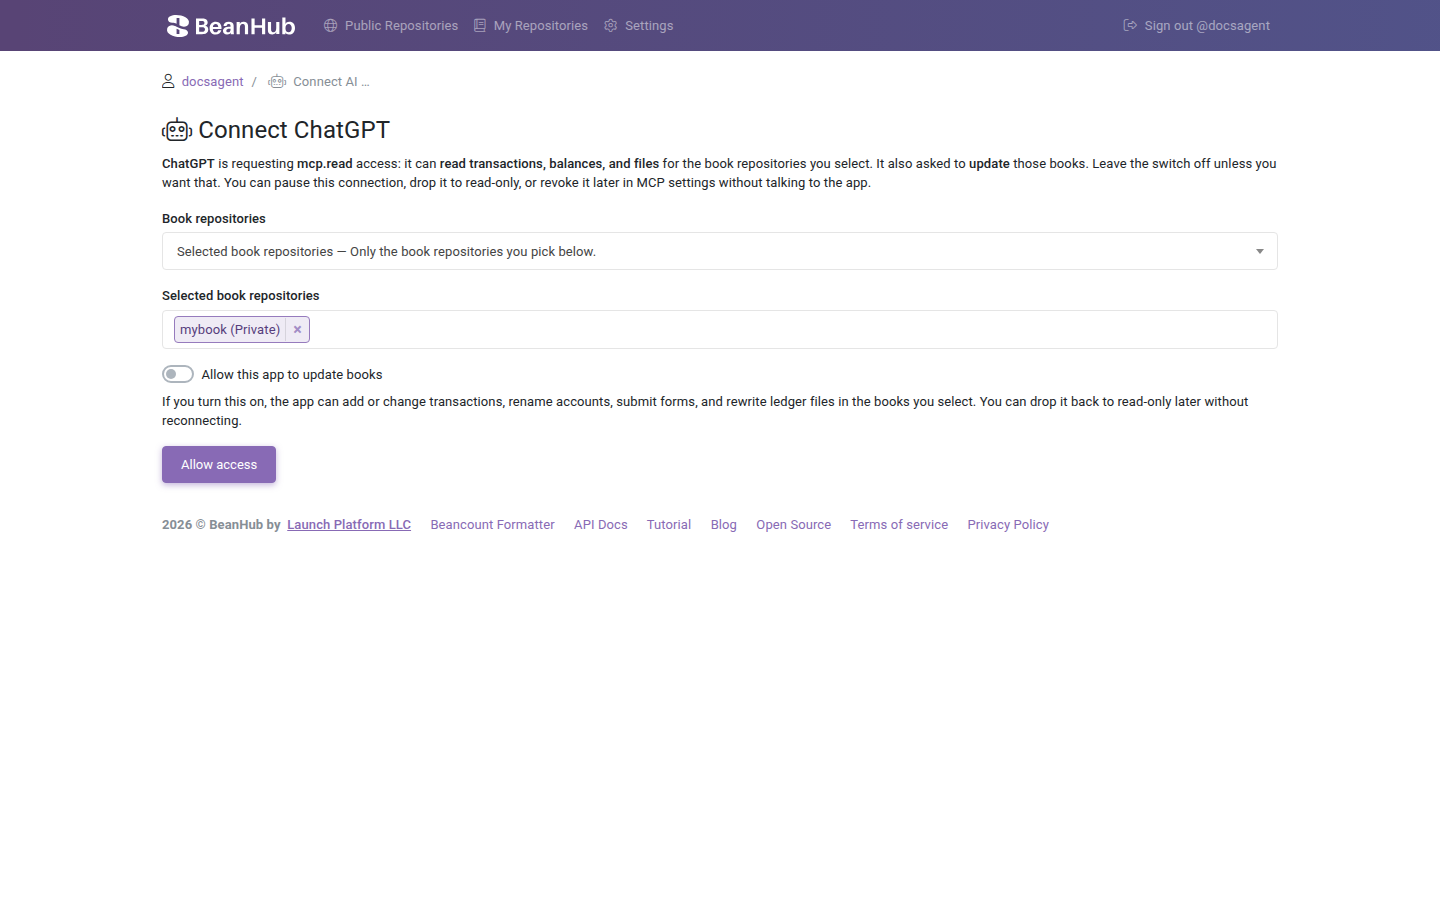
The token BeanHub issues has only the scopes you granted, even if the app asked for more. You do not start this flow from MCP settings. The AI app starts it.
Hosted BeanHub MCP works with ChatGPT on the web through developer mode. OpenAI lists Plus, Pro, Business, Enterprise, and Education. These steps follow that developer-mode article, not a logged-in ChatGPT session in this guide. Labels move as ChatGPT ships UI changes.
- Enable MCP in BeanHub and copy
https://api.beanhub.io/mcp. - In ChatGPT, turn on Developer mode. OpenAI’s current developer docs put this under Settings → Security and login. Workspace help also mentions Settings → Apps → Advanced settings. If you do not see the toggle, your plan or workspace admin settings do not include custom MCP yet.
- Go to ChatGPT Plugins (or Settings → Apps → Create on a Business or Enterprise workspace). After developer mode is on, use the plus button to create a custom app.
- Paste
https://api.beanhub.io/mcpas the MCP server URL. Choose OAuth. Do not paste an access token, and do not add a static client secret. BeanHub registers the app itself. - Complete BeanHub’s connect page. Leave Allow this app to update books off unless you want ChatGPT to change the book.
- In a conversation, open the plus menu, choose Developer mode, and enable the BeanHub app.
OpenAI’s help article: Developer mode and MCP apps in ChatGPT.
Claude custom connectors use remote MCP. Anthropic documents this in Get started with custom connectors using remote MCP. Free plans are limited to one custom connector. These steps follow that article. The add-connector form itself needs a Claude account.
- Enable MCP in BeanHub and copy
https://api.beanhub.io/mcp. - In Claude, open Customize → Connectors.
- Click +, then Add custom connector.
- Paste
https://api.beanhub.io/mcpas the server URL. - Skip Advanced settings OAuth client ID and client secret. BeanHub uses dynamic client registration with
token_endpoint_auth_method=none. You do not mint those values. - Click Add. Complete BeanHub’s connect page.
- In a conversation, click + → Connectors and enable BeanHub.
Team and Enterprise owners add the connector under Organization settings → Connectors first. Members then click Connect on that row.
Grok custom MCP connectors are documented by xAI in Connectors. These steps follow that page. The New Connector form itself needs a Grok account.
- Enable MCP in BeanHub and copy
https://api.beanhub.io/mcp. - Open https://grok.com/connectors.
- Click New Connector, then Custom.
- Paste
https://api.beanhub.io/mcpas the MCP server URL. - Complete BeanHub’s connect page when Grok starts OAuth.
Grok Business and Enterprise need a team admin to provision the connector before members can use it.
Cursor connects to a remote MCP server over HTTP and signs in with OAuth. Do not put a BeanHub access token in headers. Cursor will open BeanHub’s connect page.
Settings UI
- Enable MCP in BeanHub and copy
https://api.beanhub.io/mcp. - Open Cursor Settings → Tools & MCP, or Customize → MCPs.
- Add a custom MCP server. Set the URL to
https://api.beanhub.io/mcp. - Complete BeanHub’s connect page.
Cursor’s labels move between builds. If you do not see Tools & MCP, use Customize in the sidebar, then MCPs. Cursor also documents this in How do I install an MCP server manually?.
mcp.json
Project file: .cursor/mcp.json. Global file: ~/.cursor/mcp.json.
{ "mcpServers": { "beanhub": { "url": "https://api.beanhub.io/mcp" } }}Do not add a headers bearer token. Do not add Cursor’s static auth client ID unless BeanHub has given you one. Hosted BeanHub supports dynamic client registration, so the url field is enough.
Any remote MCP client that speaks OAuth can use https://api.beanhub.io/mcp. The app must be able to register a public OAuth client (no client secret) and open a browser for BeanHub’s connect page.
Google Gemini Enterprise custom MCP is a Google Cloud admin setup, not the consumer Gemini app. It is not covered here.
Pause, updates, and revoke
Section titled “Pause, updates, and revoke”Connected apps are listed under Connected apps on MCP settings. Each row has an Allow updates switch and a Paused switch, plus Edit books and Revoke.
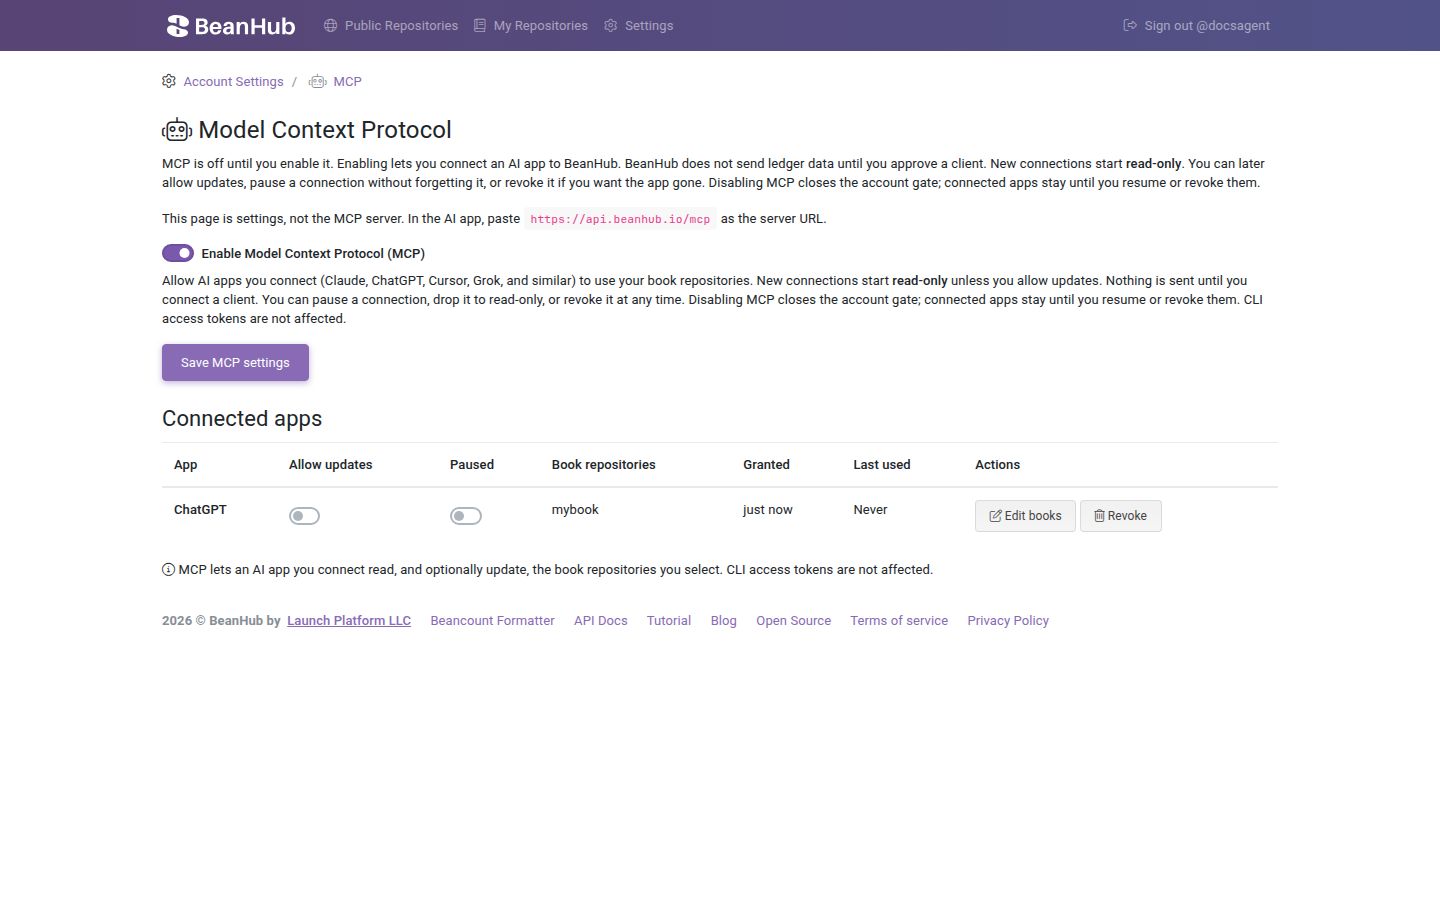
You can pause, drop to read-only, or revoke later without talking to the app.
Pause and resume
Section titled “Pause and resume”Turn the Paused switch on to shut the gate and keep the connection. The grant, refresh token, and client stay. The next MCP call returns an error that the connection is paused. Refresh still works so the app does not think it was kicked. Turn Paused off to resume. Existing unexpired access tokens work again.
Use Paused when you want a break. Use Revoke when you want the app gone.
Read-only and updates
Section titled “Read-only and updates”| Access | Meaning |
|---|---|
| Read-only | The app can read ledger data and files for the books you selected. mcp.read |
| Can update | The app can also mutate those books. mcp.write plus mcp.read |
The Allow updates switch on the connected-app row changes the grant immediately. Turn it on to grant write. Turn it off to drop the app to read-only. The next tools/list hides or shows write tools. Write calls on a read-only grant return a tool error. Tokens are not revoked.
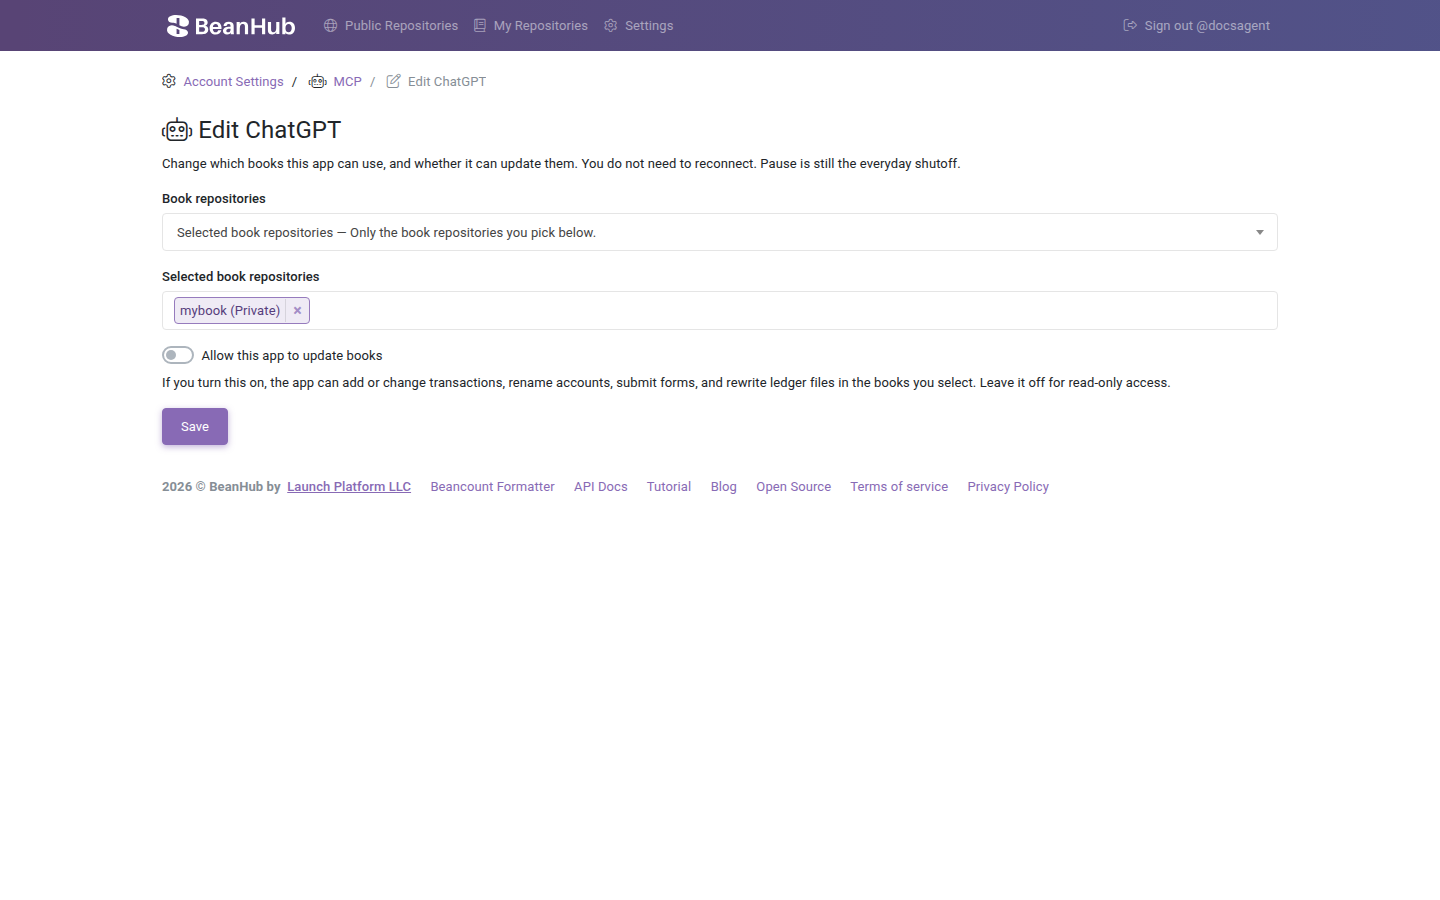
Edit books opens the same book picker as connect. You can also allow updates there. No re-OAuth.
Revoke
Section titled “Revoke”Revoke forgets the app. The grant and tokens die. The app must connect again. Confirm before you revoke.
Disable MCP on the account
Section titled “Disable MCP on the account”Turn off Enable Model Context Protocol (MCP) and save. That closes the account gate. Connected apps stay. Individually paused apps stay paused. Enable MCP again and unpaused connections work with their existing tokens.
Disable is not Revoke. Revoke one row if you want that app gone.